|
Programming Course |
Chapter 8Inventor II - Programming in C++, Structure of a Program and Nodes |
A program always describes a scene first and then specifies which viewer should be used for displaying the scene. This is true for Inventor and many other graphics programs.
To build the Scenegraph, it has to be specified which node is a child of which other node. This has to happen in the right order, so that material and transformations are described before the shape is drawn.
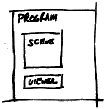
 As we have learned in the previous lecture,
there needs to be a function called main(), which contains the
commands to initialize and build the scene. It is also necessary
to reference the root node. With the main() and ref() function
the program structure will look like this:
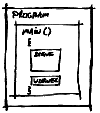
As we have learned in the previous lecture,
there needs to be a function called main(), which contains the
commands to initialize and build the scene. It is also necessary
to reference the root node. With the main() and ref() function
the program structure will look like this:
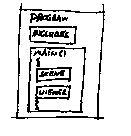
In order to know about Inventor objects and functions a number of files, so called header files, have to be included in the program. This can also be necessary for objects and functions defined by the programmer in other files, which have to be combined with the code in this file when compiling.
It is possible that the same sequence of commands needs to be executed several times with different parameters. In this case it might be a good idea to define a new function for the execution of those commands. Functions and variables with mnemonic names make the code easier to read.
As you will see, there are many right ways to program the same thing. This is nice because everybody can chose the approach he/she feels the most comfortable with. On the other hand it makes learning difficult, because there are a lot of options to chose from instead of a straight way to go. We propose that you should start with a working program and modify it until it does what you intended it to do. This is a valid approach to learn programming, specially for tools, like Inventor, that can do very complicated things. It is allowed to copy code, learn from reading it and then use the code as a base for your program. But, if you use code from another person, always keep a reference to the author in your file. And, if there is a copyright note in the code do not copy it unless you have the permission to do so.
5 basic nodes are introduced so that you can get started with modeling 3D scenes:
In the Scenegraph the Separator node is used to isolate effects of nodes in a group. All nodes of the group have to be made its children. You do not have to set any values to the variables of a Separator.
SoSeparator *root = new SoSeparator;
Cubes and Spheres are specialized shape objects. The important variables to be set are width, height and depth for the cube. The default value for those dimensions is 2.0.
SoCube *mycube = new SoCube;
mycube->width = 1.5;
mycube->height = 2.7;
mycube->depth = 2.1;
And for the Sphere the radius can be specified, default = 1.0.
SoSphere *mysphere = new SoSphere;
mysphere->radius = 0.9;
The material node can be used to set the color of the shapes that come after it in the Scenegraph. For the beginning lets look at the diffuseColor, which is the most influencing factor for the resulting color of an object. The default value for the diffuse rgb-color is [0.8 0.8 0.8], the first parameter is for the amount of red, the second for green, the third for blue. Values range from 0 to 1, white is [1 1 1], black is [0 0 0], a not absolutely saturated red is [0.8 0 0].
SoMaterial *myblue = new SoMaterial;
myblue->diffuseColor.setValue(0.0, 0.05, 0.9);
The Material node has fields for other kinds of color, shininess and transparency, everything you want to specify for solid colored materials. You can look up the other fields of SoMaterial in the quick reference.
The Transformation node can specify and combine translation, rotation and scaling into one transformation. The default values are set so that no transformation will happen. A translation is defined by three values for X, Y, and Z. The default orientation of the coordinate system is so that Y points upwards.
SoTransform *mytrans = new SoTransform;
mytrans->translation.setValue(1.2, 0, 2.8);
The rotation is defined by a vector which defines the rotation axis and a value for the angle in radians. The following defines a quarter turn around the Y-axis:
mytrans->rotation.setValue(SbVec3f(0 1 0), 1.57);
Shapekits can be used for any Inventor shape node. Shapekits combine material, transformation and shape into one node, so that you do not have to create and arrange each node individually. The following example produces a blue cube like the one from example.iv in the previous exercise.
SoShapeKit *mykit = new SoShapeKit;
mykit->setPart("shape", new SoCube);
mykit->set("shape { width  2  height 2  depth 2 }");
mykit->set("material {diffuseColor 0.0 0.0 1.0}");
mykit->set("transform {translation 2.5 0.0 0.0}");
In the set() function the form of the string between " and " is actually like the iv-form. Attention, because it is a string, it is not possible to use variables inside of it.
Viewers are the actual interface to a scene. There are 4 types of viewers: the ExaminerViewer, the WalkViewer, the FlyViewer, and the PlaneViewer. Important functions are common to all viewers, the difference is mostly in the tools for navigation. They all have a "?" button build-in, which explains the interaction possibilities. This shows how powerful working with a programming library like inventor can be. You don not have to program the interface and it even comes with a user-friendly help interface. . In the following specifics of navigation of two important viewers are explained. For navigating you have to select the arrow cursor from the buttons on the right.
The examiner viewer treats the scene like an object. It lets you rotate the whole scene, so that you can look at it from all sides. It is also possible to use the zoom to get a closer look at the object.
This is how a walk viewer is coded into the main function, (for the ExaminerViewer replace SoXtWalkViewer with SoXtExaminerViewer):
void main(int , char **argv)
{
 Widget myWindow = SoXt::init(argv[0]);
 SoSeparator *root = new SoSeparator;
 root->ref();
 ...
 ...
 SoXtWalkViewer *myViewer = new SoXtWalkViewer(myWindow);
 myViewer->setSceneGraph(root);
 myViewer->setTitle("MY WALK VIEWER");
 myViewer->show();
 SoXt::show(myWindow);
 SoXt::mainLoop();
}
int integer number, often used for counting.
float floating number, you can use float types for all coordinates and dimensions in Inventor.
char the character type is used for strings, which are defined as an array of characters or a pointer to a char, like:
char *word = "football";
enum An enumeration declares a set of constant integer variables, the following command sets LEFT = 0, RIGHT = 1, and CENTER = 2. In the follow example text_position becomes a new type and can be used to declare a variable.
  enum text_position {LEFT, RIGHT, CENTER};
  text_position mytextpos = CENTER;
SbVec3f This is a 3D vector
class used to represent points or directions. It has some useful
functions associated with it which you will get to now later,
for now you will use it to define the axis of a rotation.
Sb... stands for Scene Basic Type, like SbColor, SbString, SbTime.
So... stands for Scene Object, usually a node, sometimes an engine.
You will get to know many functions, two are important for building the Scenegraph. They are always used in combination with nodes:
addChild to add the first child to a node or additional children the to the end of the list of children.
  root->addChild(mytrans);
  root->addChild(mymaterial);
  root->addChild(mycube);
insertChild is used to add a child at a specific position, the first position is 0. This is useful to insert transformations or materials before a shape.
  root->addChild(mycube);
  root->insertChild(mytrans, 0);
if The if-statement tests a particular condition, if that condition is true an action or set of actions is executed. Form:
  if (expression) {
   statement 1;
   statement 2;
   ...
  }
while the statements will be executed as long as the condition
after while is true.
  while(a == 1) {
   statement 1;
   statement 2;
   ...
  }
for is used to step through a set of statements until a
condition becomes false, usually a counter variable of type int
is modified until it reaches a limit, i++ is a way to increase
i by 1 every time the loop is executed:
  for (int i = 0; i<7 ; i++) {
   statement 1;
   statement 2;
   ...
  }
When defining a new function you have to know whether or not it should return a value. In the definition the function name is preceded by the return type or void. For your first applications it will be fine to have void functions, this means functions that do not return anything value, but execute a number of statements.
The second thing to specify are the arguments and their types. The C++ compiler checks the types in every call to a function. If the types do not match an error message will be produced and the compilation will fail.
The following function will produce a number (num) of cubes, each one at a defined distance (dist) from the previous:
void makecubes(SoSeparator *root, int num, float dist)
{
 SoTransform *atrans = new SoTransform;
 atrans->translation.setValue(dist, 0.0, 0.0);
 for (int i = 0; i < num ; i++) {
  SoCube *acube = new SoCube;
  root->addChild(atrans);
  root->addChild(acube);
 }
}
In main you can call the function with: makecubes(root,
5, 3.2);
At the very beginning of your C++ file you have to list every header file that needs to be included.
Including a header file is written like this:
#include <Inventor/nodes/SoCube.h>or like this if the include file is in the same directory as your program:
#include "student.h"Every viewer, node, field, or kit, that you refer to in your code is declared in a header file. The man-pages can help to find out which header files you have to include.
The goal is to get used to the commands of a C-based language and to learn to program 3D environments with Inventor. The task is to modify the program that generates a model of Max Bill's Sculpture at the Bahnhofstrasse in Zürich.
These are the steps for proceeding with this exercise:
The on-line book 'The Inventor Mentor' and the hardcopy version of it are good places to look for explanations and samples of code.
If you get compiler errors, it is often because the types in the function call do not match or because a header file is not included. The error message indicates the line where the error happens. Take a look at that line and try to figure out the problem.
If you think you understand every line of code of the program, which means that you can modify it and know what is going to change in the model, you have completed this exercise and are ready for next weeks exercise.
Upload a modified c++-program of the Bill sculpture and a snapshot
in GIF format.
